How to Create Student Podcasts in the Classroom: All Your Questions, Answered

“A lot of people listen to podcasts because they want to learn something and be entertained along the way.” — Author Alex Blumberg
Last year, my journalism students created a podcast. None of us had any experience with podcasting and there was quite a bit of trial and error, but it was easily one of the coolest things I’ve been involved with as a teacher.
Students planned, recorded, and edited their episodes on an iPad and published using the Anchor FM app. When we transitioned to distance learning due to the COVID-19 crisis in the spring, students continued recording their podcasts together remotely.
Since then, I’ve heard lots of folks inquiring about creating podcasts in the classroom, so I asked my Instagram followers what they wanted to know. Below are some of their questions. I’m no expert, but here’s my experience and what I learned from it.
This post contains affiliate links.
Getting Started 📌
Q: What’s the first step in getting started?
A: Without a doubt, the first step in having students create their own podcast is to listen to mentor podcasts. Lots of them.
Think about it. If an English teacher is going to have their students write a poem, they’d probably start by reading and discussing some poetry, right? It’s the same for podcasts.
Although podcasts are wildly popular and my students were super into the idea of making one, I was surprised to learn that many of them didn’t regularly listen to podcasts. Thus, having a variety of mentor texts was absolutely essential.
Not sure how to introduce your students to podcasts? Ashley over at Building Book Love has this covered. Click to learn more about planning a podcasting unit: How to Plan a Podcast Unit for Middle or High School Students. She also has some great recommendations here too: Podcasts for Kids: An Epic List of Podcasts and Activities.
The Planning 📋
Q: How did students plan for the podcast?
There are many different types of podcasts and each type requires careful planning — it’s definitely not as simple as just talking into a mic for 10-15 minutes. Below are a few different types of podcasts you may want to review with students:
Nonfiction Narrative (Lore)
Fiction Narrative (Night Vale)
Conversational / Co-hosted (Stuff You Should Know)
Interviews (The Daily)
Repurposed content (TED Radio Hour)
Hybrid (Short Wave)
Note: The examples I listed above may contain episodes that may not suitable for everyone. I’m mainly listing them for you to get an idea of the possible types your students might create. As always, use your judgement before sharing with students.
Once students decided which type of podcast they want to create, I made a quick outline template using the tables feature in Google Docs. It wasn’t anything fancy, but it did the trick.
Q: How did you assess the scripts?
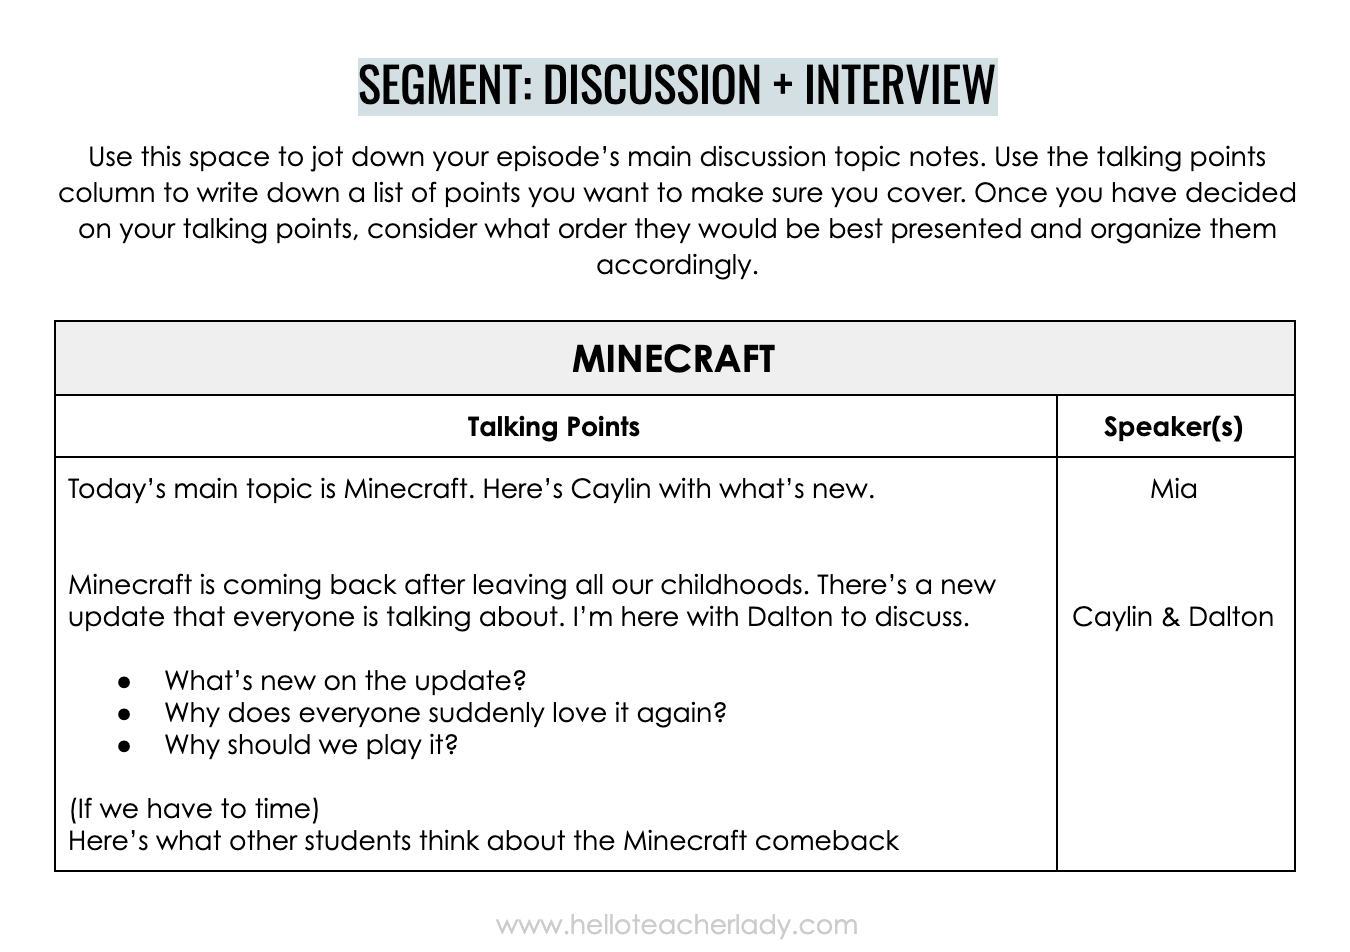
A: I first had my students complete an outline of their episode based on the type of podcast they wanted to create (see above). They divided their episode up by segment and wrote a series of “talking points” for each.
Sometimes they wrote complete sentences, while other times they just wrote bullet points. When they were done with the outline, I would review it to make sure they had covered all the bases and left feedback as needed. An example of one of their segment outlines is below.
The Recording 🎙️
Q: How did students record their audio? What technology is needed?
A: My students used a Blue Snowball iCE mic and an Apple Lightning-to-USB adapter to record their audio onto an iPad. The mic runs about $50 on Amazon. The adapter was about $30. The mic plugs into any computer with a USB port; we only needed the adapter because my students had school-issued iPads I wanted them to use, and iPads don’t have a USB port.

If you’re not ready or able to shell out the cash for a better quality mic, students can also record using the built-in microphone on a phone or iPad.
NPR has a really neat video about making pillow forts to improve the sound quality. My students ended up using this trick and it worked really well.
Q: Where did your students record?
A: First, my students tried to record in the hallway, but they were inundated with questions from folks passing by and they found that quite frustrating. Plus, the sound quality wasn’t that great either. We ended up finding a small conference room for them to record in where they could close the door and not have to worry about disruptions. Our administrative assistant kindly offered her office when the conference room wasn’t available.
I realize this may not be an option for everyone. The trick is just finding a quiet space where other students won’t be walking by, so a corner of the library or a vestibule area could work too. For better quality audio, you’ll want to record in a smaller space rather than in a wide open space like a gym or cafeteria. Oh, and definitely check out that pillow fort video. It really does make a difference!
Q: Did you supervise students while they recorded?
A: No. There were only about 4 students recording at a time, so I didn’t really feel the need to supervise them (nor would I be able to). I could hear what went on in the raw audio when they returned, so it’s not like they were gone for half an hour and I had no idea what they were doing. I was also very clear about my expectations and gave them a specific time frame to work within.
I realize this may not work for everyone. If you’re worried about sending students off unsupervised, you could always have students come to your room during lunch or after school.
The Editing 🎧
Q: How did students edit their podcast?
A: This was probably the biggest learning curve for all of us. I had some familiarity with the basics of editing tools, but my students did not. Still, every platform is different.
One of the biggest reasons we chose Anchor FM, aside from the fact that it’s free, is because it has built in recording and editing capabilities. It’s not super advanced by any means, but it does the basics and that’s really all they really needed. Anchor also has the option to add in sound effects and other audio tracks, which was a huge bonus.
At first, students had to do quite a bit of editing and it was super time consuming. As they became more comfortable with the process of recording and editing though, the time spent editing was cut down immensely.
There are other editing platforms out there, but they usually cost a bit of money.
Q: What editing tips or strategies can you share?
I recommend having at least two students in each group that take on the role of editor. Not everyone needs to edit (too many cooks in the kitchen, y’know?) but it’s helpful to have more than one student know the ins and outs of the app.
Another thing that helped my students in the editing process was transitioning to the mindset that whatever was being recorded couldn’t be edited (even though that wasn’t technically true). Students seemed to make less mistakes (and were much more focused overall) when they pretended like they only had one shot to get it right.
Lastly, my students benefited immensely from the “clapping” trick. This was a trick I learned when I first started my YouTube channel. Basically, when you’re recording and you make a mistake, clap. When you’re looking back at the audio waves during the editing process, you will be able to see the clap as a higher wavelength. This allows you to quickly see where the mistake was and edit accordingly.
The Publishing 🎉
Q: How did students publish their podcast?
A: Students published through the Anchor app. Anchor gives you the option to keep the podcast on Anchor only, or to open it up to a larger audience. Since it was a journalism class, we opened it up to a larger audience and published on Apple Podcasts.
Q: Did you need to get parent permission?
A: Yes; however, only because we were publishing to a larger audience. If you’re just having students create episodes and keeping them in an enclosed space (like a learning management platform), you probably don’t need to get explicit permission. Not a bad idea to let parents and guardians know what you’re up to, though.
Did I miss anything? What more do you want to know? Comment below!
PS: Remember to check out Ashley’s post for more podcasting inspiration.